|
How do I allow and configure trial
hosting for the plan?
What's
trial hosting?
See Providing Trial
Hosting
See Editing Plans and Prices
(Plan Edit Wizards)
See Creating New Plans (Plan
Creation Wizards)
How do I set/change prices for the
plan resources?
What
are prices for the plan resources?
See Creating New Plans
(Plan Creation Wizards) to set prices for the plan resources.
See Editing Plans and Prices
(Plan Edit Wizards) to change existing prices.
How do I enable/disable particular
plan resources?
See Creating New
Plans (Plan Creation Wizards)
See Editing
Plans and Prices (Plan Edit Wizards).
How do I set the system to allow only
credit card payments?
What
is credit card payment?
Select Merchant Gateway in the Settings menu.
On the page that appears, switch Accept checks OFF:

Note: changing this parameter affects the whole
system, not separate plans.
How do I set/change the amount of free
resource units?
What
are free resource units?
See Creating New Plans
(Plan Creation Wizard) to set the amount of free resource units.
See Editing Plans and Prices
(Plan Edit Wizard) to change the amount of free resource
units.
How do I create more billing
periods?
What
are billing periods?
Select Plans in the INFO menu. On the page that appears,
click Settings. Make sure Billing is ON. In the
Billing Configuration section, click the Add icon:

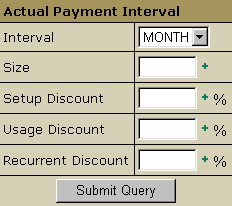
- Interval: the time unit used to specify payment
interval duration.
- Size: the number of such time units in this payment
interval.
- Setup D, Usage D, Recurrent D: discounts
for different type of fees.
- Control: click the Edit icon to modify settings
for the above parameters.
NOTE: In Control Panel 2.0x billing periods cannot be deleted.
How do I set discounts?
What
are discounts?
You set discounts when creating a new billing period,
and then change them at any time afterwards.
Select Plans in the INFO menu. On the page that appears,
click Settings. Make sure Billing is ON. In the
Billing Configuration section, click the Add icon
or the Edit icon.
Either link brings you to the following page:

*See more about prices/fees.
Example: Entering 2 in the Size box and 10 in the
Recurrent Discount box will reduce the recurrent fee
by 10% for all accounts with the payment interval of 2 months.
IMPORTANT: if you directly specify recurrent/setup/usage
prices for this actual payment interval in Plan Creation/Edit
Wizard, the discount values will be ignored.
How do I set credit limit
for a plan?
What
is credit limit?
See Creating New Plans
(Plan Creation Wizard) to set credit limit.
See Editing Plans and Prices
(Plan Edit Wizard) to change credit limit.
How do I set a different
credit limit for a particular account?
What
is credit limit for a particular account?
Find the account to change credit limit for. On the Search Result page
click the credit link next to this account and enter new credit limit.
The number in the entry shows the amount that plan credit limit was enlarged
by for this account.
*See Searching
Accounts to learn how to find needed accounts.
How do I enlarge balance for a particular account?
What
is enlarging particular account balance?
Find the account. On the Search Result page click the Credit
link next to this account and enter the amount you credit to this account.
*See Searching
Accounts to learn how to find accounts.
How do I set the maximum amount of resource
a user can create under the plan?
Select Plans in the INFO menu. On the page that appears,
click Resource. Select Edit next to the
resource you want to restrict. You will be taken to the Resource
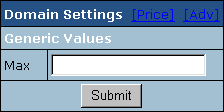
Settings page with the following form:

In the Max field enter the limiting amount of resources.
For example, if you set Max disk space to 200, no single user of this plan
will be able to set disk space quota higher than 200 MB.
How do I set/change extra charges
for exceeding resource limits?
What
are extra charges?
Launch Plan Creation Wizard
to set or Plan Edit Wizard
to change. Go to the Set Prices page:

All resources within quota are charged at the
Recurrent price. All resources used in excess of the quota
are charged at the Extra price. On the Default Billing
Period page, the prices are called Monthly and Extra.
*See more about Quotas.
How do I disallow signup for
the plan?
Suppose you have created System plan and you want
to disallow signup for it. Select Plans in the INFO menu.
Then, click the Access link. In the form that appears,
you will see a list of plans in your system. Uncheck those you
don't want to sign up for System.
How do I allow my customers to
claim their money back?
What
is moneyback?
- Select Plans in the INFO menu.
- Click the name of the plan to start the wizard.
- Scroll down to the Settings section.
- In the Money Back Guarantee field, enter days after signup
when customers can claim their money back.
- Check the box on the right.
- Scroll down to the bottom of the page and check Don't change resources prices.
- Click Next.
How do I set Refund Percentage?
What
is refund percentage?
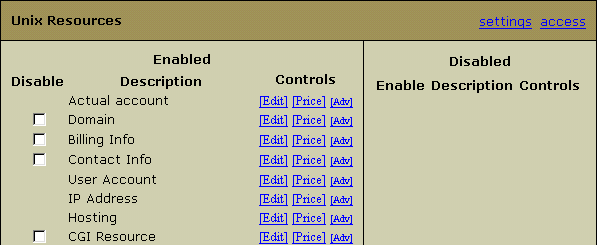
Select Plans in the INFO menu, then click Resources.
You will see the resources included in the plan:

Click Price next to the resource to set
refund percentage for. You will be taken to a form
similar to the following:

In the Refund Percentage field, enter which
part of the recurrent fee that will be returned to the user.
Example: User's billing period started on November 1 and is closing
on November 30. The recurrent price for dedicated IP is $3. At the beginning
of the billing period the user was charged $3 recurrent fee for dedicated IP.
On November 10 the user switched to shared IP. With 10% refund percentage he
will get back $0,2 refund. The refund will be added to the account credit.
How do I enable e-mail invoicing for accounts under a certain plan?
What is E-mail Invoice
Notification
Launch the corresponding plan edit wizard. On the first step go to the Settings
section and check the E-mail invoice notification box.
|