|
This document describes the advanced plan controls.
It is recommended to avoid using them, if the same task
can be done with the plan edit wizards.
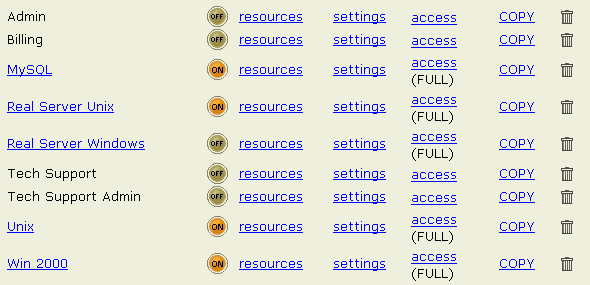
Plan controls are available on the first page that opens
as you enter the admin Control Panel:

- ON/OFF - turning the plan off will not remove
accounts or plan settings, but will just block signup for
it for all users including admin himself until he enables
it again.
- Resources - include or
exclude specific resources in this plan. If you are not
well familiar with the system, it is highly recommended
to use the Plan Edit Wizard
unless this is one of admin-level plans that cannot be modified
via the wizard.
- Settings - RESERVED FOR Control Panel DEVELOPERS ONLY ! DON'T USE !
- Access - set which users
have permissions to create accounts under this plan.
- Copy - create a copy of this
plan. You may need this option to create a new plan based
on the selected plan.
- Delete (version 2.05 or higher)
- delete a plan.
Resources
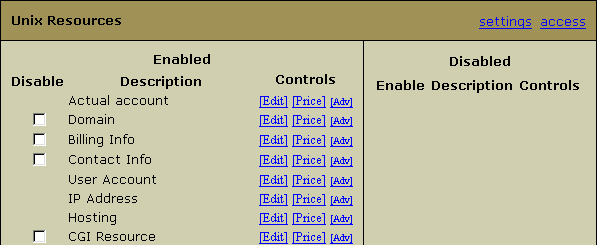
If you are well familiar with the resource hierarchy, you
can use the Resources page to enable or disable resources
in the selected plan:

All resources are organized hierarchically, which requires very careful handling.
Disabling a parent resource will disable all its child resources.
Some resources cannot be disabled
(like User Account, IP Address, etc. in the example
above). These are the so-called "required" or "service"
resources vitally important for the correct operation
of the plan (version 2.09.5 and higher).
To enable or disable a specific resource, check it in the
correspondent column and click the Change button. This
resource will become available or unavailable to all users
under this plan.
Edit
Edit page allows you to set basic parameters for the plan:

- Max: set the maximum number of resource units a
user can buy under this plan.
Note: as for IP, you can set the 'Max' value only
to dedicated IPs.
- Removable: define whether the resource can be removed
by a user. Use this option to make sure this resource can
never be deleted under this plan.
- Addable: define whether the resource can be added
by a user under this plan.
- Custom Values: provide extra configuration parameters.
Don't add custom values unless you definitely know how to
use them.
Access
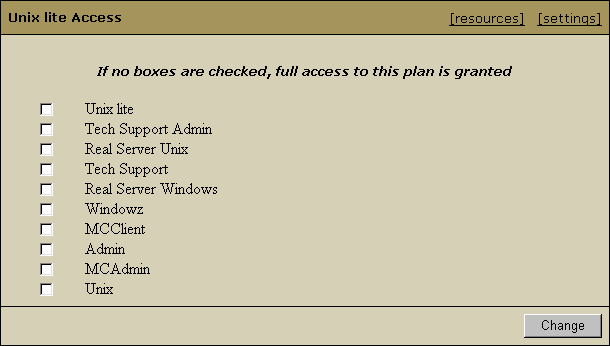
Access page allows you to set which users have permissions
to create accounts under this plan:

Here you can choose users who can create accounts under the
selected plan. The Admin plan, for example, should not be
available to any other users other than the administrator.
To grant permissions to plan users, check the boxes for this
plan in the list. For the Admin plan, only Admin box
should be checked. If no boxes are checked, this plan will
be available to all users, including those who are registering
accounts "from the street".
Copy
Alternatively to the Plan Creation Wizard, you can use this
feature to create custom plans based on
prviously created plans. To create a new plan, click Copy for the selected
plan sample. The newly created copy will appear in the plan
list. You can now modify it according to your needs via Plan
Edit Wizard or above discussed configuration tools.
Delete
Although deleting plans is quite a rare procedure (as plans
are essential part of the whole system), you may want to delete
needless or harshly created plans. To delete a plan, go to
the Plans page, Info menu and click the
Trash icon in the selected plan entry.
Warning: Deleted plans cannot be restored by any means!
Do not delete any of the system default plans because they
serve to create custom plans!
It is impossible to delete a plan if there is at the least
one account created under it. In other words only those plans
free of accounts can be deleted.
To see your deleted plans list, click the Deleted Plans link under the
System Plans chart on the Plans page, Info menu.
Mass credit limit reset (version 2.09.6
and higher)
Go to E. Manager > Other. On the page that appears, you will be
able to reset credit limit for all accounts to the plan's credit limit default value. This will cut down all the personal credit enlargements you set to your users' accounts.
The second option is available for the admin only.

|