|
To perform any operations with an individual account, you need to find it in the system using the Search utility in the navigation menu. From the search results page you can:
Viewing User and Account Information
To view details of a particular user or account:
- Find the account using the Search utility.
- Click the username to view contact info and billing info.
- Click the account ID to view account details.
- Click the View icon in the Balance column to view balance details.
Crediting Accounts
To credit a fixed amount to an account:
- Find the account using the Search utility.
- Click the Credit icon in the Billing column.
- Enter the amount:
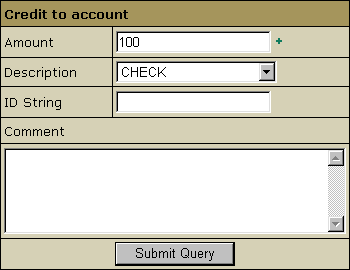
- Amount: don't enter negative amounts; instead, use the debit utility.
- Description: the reason for crediting the account.
- ID String: the explanation to the transaction that will show up in the invoice and the balance statement.
- Comment: this comment won't show to users.
Changing Billing Period Starting Date
(version 2.08 and higher)
To change or reset the beginning of account's billing period:
- Find the account using the Search utility.
- Click the Date icon in the Billing column.
- Enter the starting date of the next billing period.
- Click Submit.
Be very cautious when using this feature. Changing the billing
period starting date may result in major problems:
- If you shift the period starting date backwards, the
client will be charged the recurrent fees twice for the
overlapping days (for the remainder of the old period AND
for the new interval). For instance, the initial payment
interval date was November 11. If you set the date to November
2, the system shall charge the recurrent fees till the end
of the old period (i.e. November 11) and once again for
the new period (which starts now on November 2). Thus, the
9 days will be charged double recurrent fees. Most likely,
you will want to credit the extra
charged amount back to user's account.
- If you shift the starting date forward, you will close
the current billing period. The next payment interval, however,
will start only on the date that you set. This way, you
will create a gap between the billing periods. The system
does not charge the customer for the time gap. The
customers are only charged the recurrent fee for the resources
like traffic or MySQL Quota that they actually use up. Also,
if a user purchases some resources during the gap period,
the system will charge the recurrent fee for these resources.
However, it will calculate the price from the moment of
purchase till the end of the new billing period. Say, you
close the current billing period on November 11 and set
the new starting date to December 1 (with a one-month payment
interval). This way, the user does not pay any recurrent
fees the remaining days of November. Still, if a user
buys a resource on November 20, he/she will be charged the
recurrent fee for the interval of 40 days (November 20 -
January 1).
- If you set the same billing date for many customers, the
system may become overloaded on this billing day.
Debiting Accounts
(enhanced in version 2.1)
To debit an account:
- Find the account using the Search utility.
- Click the Debit icon in the Billing column.
- Select from multiple debit options:
- One-time debit
Debit account once.
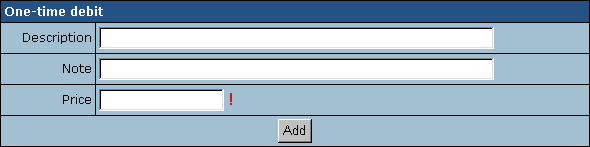
Description: the title of the charge displayed in user' invoice and balance statement.
Note: the comment displayed in small font in user' invoice and balance statement.
Price: debit amount.
- Month based debit:
Debit account every month for regular premium services.
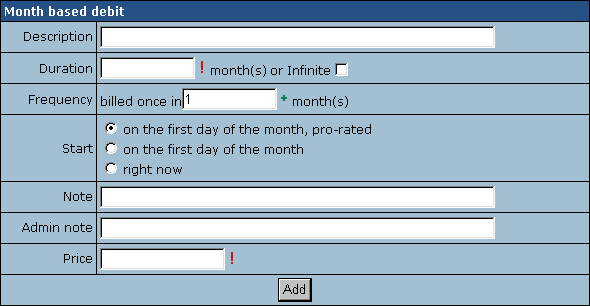
Description: the title of the charge displayed in user' invoice and balance statement.
Duration: when this period expires,
debit charges are discontinued.
Frequency: the charge cycle; leave 1 to charge the account every month.
Start:
- on the first day of the month, pro-rated: account is
debited on the 1st of each charge cycle, except for the first time.
The first debit charge is conformed with the time left to the end of the
charge cycle.
Example: enabled - 20 April; frequency - 2 months; price - $6
On 20 April the first debit charge will be applied. Account will be
charged $4 ($3 for May + $1 for ten days of April). The next debit charge
($6) will be applied on 1 June.
- on the first day of the month: account is debited on the 1st
of each charge cycle. The whole debit amount is charged without being
pro-rated.
Example: enabled - 20 April; frequency - 2 months; price - $6
On 20 April the first debit charge will be applied. Account will be charged
$6. Next $6 charge will occur on 1 June.
- right now: account is debited on the day you enabled
it each charge cycle.
Example: enabled - 20 April; frequency - 2 months; price - $6
On 20 April the account will be debited $6. Next $6 charge will occur
on 20 June, then on 20 August, and so on.
Description: the title of the charge displayed in user' invoice and balance statement.
Admin note: this note won't be visible to the user, for admin's use.
Price: debit amount.
- Billing period based debit
Debit account at the beginning of each billing period for
regular premium services.
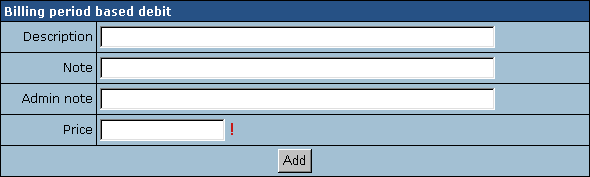
Description: the title of the charge displayed in user' invoice and balance statement.
Note: the comment displayed in small font in user' invoice and balance statement.
Admin note: this note won't show to the user.
Price: debit amount.
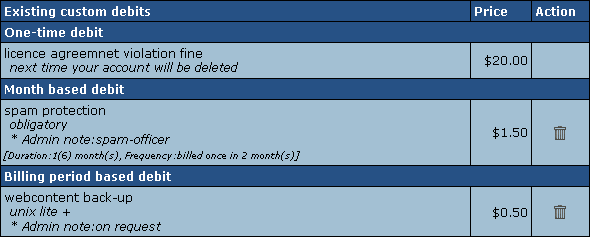
Active debiting rules are listed at the bottom of the page:
Enlarging Credit Limits
To enlarge or reduce credit limit for a particular account by a fixed amount:
- Find the account using the Search utility.
- Click the credit limit value in the Credit column.
- On the page that appears, enter the amount above plan's credit limit value. Entering a negative amount will decrease the Credit Limit. For example, the Credit Limit for the plan is $10. To make it $12 for a specific account, enter 2. To make it $8 for a specific account, enter -2.
- Click Enlarge.
Logging In As User
To log into user's control panel:
- Find the account using the Search utility.
- Click the Login icon in the Controls column.
Suspending and Resuming Accounts
To suspend or resume an individual account:
- Find the account using the Search utility.
- Click the Suspend or Resume icon in the Controls column.
Owners of suspended accounts get e-mail notifications, and can view their invoices
and billing profiles.
Note: If you resume an expired trial account, it will be suspended
again in some 24 hours. To bring this account into operation,
the trial user should create a valid billing profile.
Deleting Accounts
To delete an individual account permanently:
- Find the account using the Search utility.
- Suspend the account.
- Make sure all outstanding amounts are settled.
- Click the Delete icon in the Controls column.
Sending Mass Mails (Newsletters)
To send a newsletter to a group of customers:
- Select accounts using the Search
utility.
- Click the Mass Mail link at the bottom of the search results page:

- Compose the message:
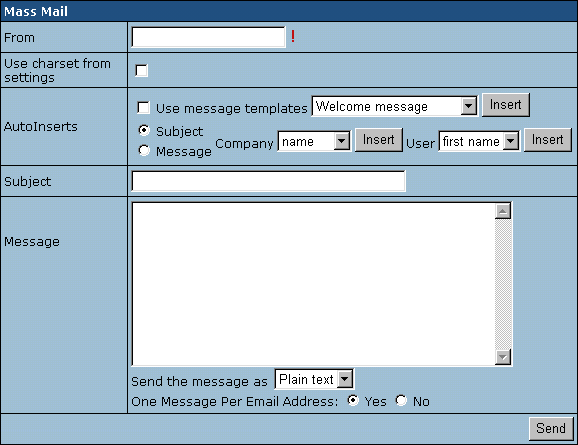
From: enter one of your e-mail addresses to send the message from.
Use charset from settings: message encoding will be set based on the
language selected by the customer.
Use Message Templates: Check this box to e-mail system notifications.
In this case, any info you enter in the message body will be ignored.
Autoinserts (version 2.09 and higher): Use this feature to convert
your mass mails into personalized letters. When composing a mass mail, insert
generic variables that will be replaced with individual recipient's name,
e-mail address, etc.
Send the message as (version 2.11 and higher): Select HTML
to apply formatting to your message, e.g.:
<i>text in italic</i><br>
<b>text in bold</b>
<ul>
<li>unordered list (bullet)</li>
<li>unordered list (bullet)</li>
</ul>
One Message Per Email Address:
-Yes - only one message will be sent to an address, regardless
of how many accounts use it.
-No - the message is sent to every account's e-mail address
even if it is the same for different accounts.
|