|
This document explains how to sign up new users from the
admin control panel.
How Do I Sign Up New Users?
There are two ways of customer registration - "from the street" and
from the admin control panel. The registration "from the street" can
be performed by the the customer without admin's interaction. The
registration from the admin control panel goes through exactly the
same steps, but can be performed only by the administrator.
Signup from the admin control panel is also the one and only way
to create accounts that are unavailable "from the street",
regardless of whether they are tagged available or unavailable
for signup, for instance admin and technical support accounts.
To sign up a new user from the admin control panel, select
Signup from the Signup menu:

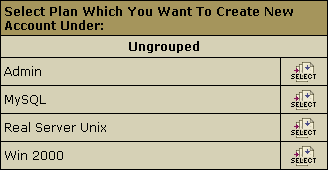
Here you choose the plan for the new account:

Signup Wizard will guide you through several steps and ask
you to fill in the forms with your contact info (name, e-mail, address,
etc.), payment info (either parameters of your credit card
or the address where the bills will be mailed to - for checks),
etc. When you are through with the Signup Wizard, account will
be either created or assigned for activation. Read below on
account activation.
How Do I Activate Check Paid Accounts?
Newly registered check paid accounts do not get activated
immediately. They need to be activated manually after receiving the check
payment from the customer.
This procedure is called account moderation.
To moderate a check paid account, choose Moderate
in the Signup menu. You will see the list of accounts awaiting
moderation:

- To reject the account moderation request, click the Delete
link on the right to the account name.
- Click the user login link to view the account's registration
data and access the activation option. Under the user data
table that comes next, you will find the Create link
to activate the account and the Delete link to reject
the request.
How Do I Ensure that Nobody Signs Up with a Stolen Credit Card?
(version 2.08 and higher)
When the attempts to use stolen credit cards become frequent,
the online processing center may close or suspend your account.
To prevent this, you can switch to the moderated credit card signup
mode and manually check each credit card, including its authenticity,
address info, and other details, before allowing
to create the account and charging the registration fee.
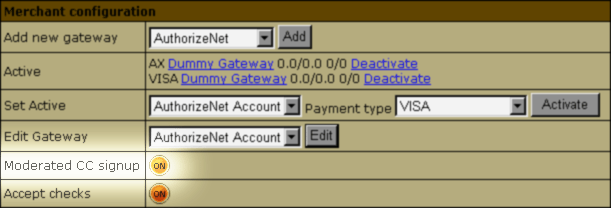
To enable moderated credit card signup, select Merchant Gateway Manager
in the Settings menu. On the page that appears, switch
Moderated CC signup ON:

You can create automatic rules (filters) to moderate accounts matching specific
criteria. Once configured, this utility decides if the new account will be created
right away or will be placed into the awaiting moderation list on the
SIGNUP->Moderate page with appropriate comments/warnings.
To configure moderation rules, do the following:
- Select SignupGuard in the Settings menu.
- On the page that appears, select which accounts will be placed in the awaiting
moderation list and click Submit.
Note: Max Amount - accounts will be moderated if the total price
for such signup is bigger than this amount.
- If you wish, you can blacklist certain account parameters delimiting them
with semicolons+white spaces.
- From now on, make sure to check the awaiting moderation list regularly.
It is available on the SIGNUP -> Moderate page.
Note: SignupGuard will never reject client signup, it will place all
suspicious signups into the awaiting moderation list on the SIGNUP->Moderate
page.
How do I know which computer signup came from? (version
2.1 and higher)
Tracking down signup IPs is useful when verifying order info to prevent fraud.
You would pay closer attention to orders having US contact information and other
country's IP address. Tracking down signup IPs is available only for moderated
accounts. To learn the IP which moderated account order came from, go to SIGNUP
-> Moderate. Click the accounts name link to view account related info.
In the Other signup information table REMOTE_ADDR entry reads
this account signup IP:

* Besides, signup IP is also displayed to subscribers on the last page of
the signup wizard.
How Do I Track My Signup Statistics?
Signup statistics includes data about accounts created and deleted by each
admin. Signups "from the street" are not included into this statistics. To read
about overall signup reports, click here.
To view the Signup statistics, choose Stats from the
Signup menu. Clicking on the underlined number in the
Live accounts column will display details
on these accounts. Click the underlined columns' captions
to sort the entries.
The Export link under the chart enables you to save
the chart data in *.csv format that is supported by numerous
spreadsheet and database programs. Commas are used as delimiters.
Moving Users from Trial to Paid
To make a trial user a pay customer, it is usually enough
to go to the Billing menu in the user's control panel
and create a billing profile for this user. In case of checks,
the user will become a pay customer after:
- you receive the check payment;
- you credit the amount to user's account;
- you resume the account.
In case of credit cards, Control Panel resumes the account
automatically.
|