|
This document covers the following topics:
Adding Domains for Third Level Hosting
To add a domain for third level hosting, you need to create a DNS zone. You must have at least one DNS zone in your system. To add a DNS zone, do the following:
- Select DNS Manager in the E.Manager menu:

- Click the Add DNS Zone link:

- Enter zone name and zone administrator e-mail and choose whether to allow third level domain
hosting in this zone:

- Name: the name of the DNS zone you are going
to create. If this domain name is not yet registered, don't
forget to register it with a domain registration company.
- Admin e-mail: the e-mail address of this
DNS zone administrator.
- Allow third level domain hosting: allow the creation of lower level domains in this DNS zone.
- Master/slave server: available only for service
DNS zones - allows you to choose and appoint a master and a slave server. The information is backed
up every hour.
- After you submit the form, the new zone appears in the DNS
Manager table:

- Click the EDIT icon to go to the DNS zone management page.
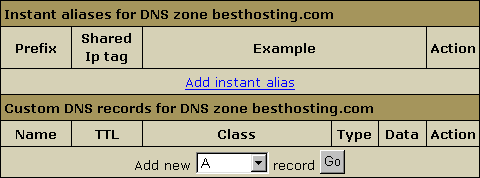
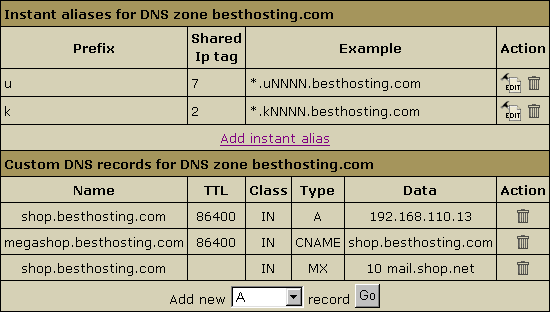
Here you can add DNS records and instant alias templates and DNS records to your DNS
zone:
Adding Instant Alias Templates
Instant Alias Templates are used to generate Instant Aliases,
temporary addresses providing immediate access to users'
domains from the Internet. They are usually helpful when the
DNS servers worldwide are being refreshed and the site is
temporarily unavailable at the regular domain name.
Creating an instant alias template will automatically add one or more
A-DNS records to your service zone. These records resolve
all your logical servers.
To add an instant alias template, click the Add instant alias
link. This will open the following form to fill out:

- Prefix: instant alias prefix that will appear on the
left to the domain part in user's instant domain alias.
Different prefixes should be set if you use different
shared IP tags. Other than that, it is recommended to
use one and the same prefix (e.g. u for all
instant alias templates).
- Shared IP tag: a digital "mark" that
helps separate sites within one plan on one logical server.
All sites located on the same logical host under the same
plan are usually assigned to the same shared IP. This feature
allows to give a different shared IP to a group of sites
of, say, explicit nature. This may become necessary as many
corporate firewalls filter sites based on their IP, not
the domain name.
Normally, you are expected to have devoted one IP address
for each shared IP tag. To use a shared IP tag, you need
to have it defined for every logical host.
Numbers 10 to 99 are acceptable.
The default value of 2 is assigned when the field is submitted
being empty.
After you have added an instant alias with a shared IP tag,
you are taken back to the list of instant aliases. The new
instant alias template has appeared in the list. This means the system
has added all necessary DNS records to the DNS zone.
Adding Custom DNS Records
To add a custom DNS record, select the DNS zone by
clicking the corresponding Edit icon:
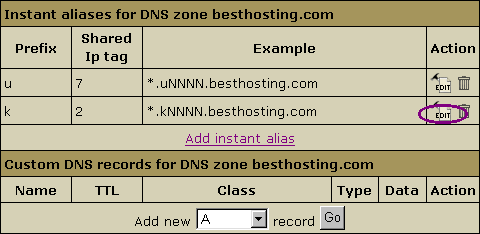
You will be taken to the DNS records page:
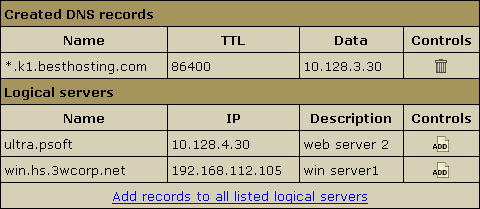
The upper part of the table lists the existing DNS A records
in the selected DNS zone.
The lower part of the table appears only when the DNS zone
does not contain A records for some logical servers. It lists
these logical servers with their IP's. To add a logical server
to the DNS zone, click the Add button. You can add all these
servers to the DNS zone by clicking the Add records to
all listed logical servers link at the bottom of the table.
You can add one of the following types of DNS records:
- A records to map domain names and web server IP's.
- MX records to map domain names and their mail
server IP's.
- CNAME records to map aliases with domain names.
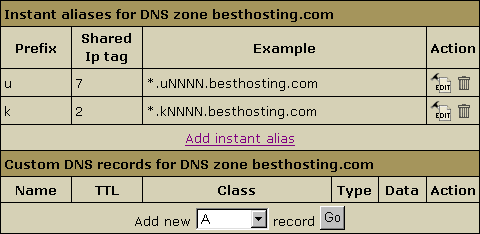
To add a custom DNS record, go to the zone management page
and select the record type from the drop-down list. Then click
the Go button:
- Adding custom A records
An A record gives you the IP address of a domain. That way,
users that try to go to www.mydomain.com will get to
the right IP address.
To add a new DNS A record, you need to provide a set of parameters:

- Name: the string appended to the domain name to
create a FQDN mapped to the IP. For example, if your domain
name is besthosting.com, entering cp will
make the fully qualified domain name cp.besthosting.com.
- TTL: seconds to elapse before the record is refreshed
in the provider's DNS cache.
- Data: the IP address that fully qualified domain
name will be mapped to. You can get this IP address with
any ping utility.
- Adding custom MX records
Adding MX records is similar to adding A records:

In case of MX records, the Data field contains the
preference and the mail domain name. If you leave the Name
field blank, all mail will be redirected to this zone.
WARNING: Please pay attention to $ORIGIN when you
add an MX record.
- Adding custom CNAME records
If you have selected CNAME record, the following page appears:

In the case of CNAME records, the values have the same format
as in the A record with the exception of the Data field.
In the Data field you have to enter the name of the server
to which you are creating the alias record.
WARNING: Please pay attention to $ORIGIN when you add a CNAME
record.
The DNS records you create appear on the zone management
page:
|